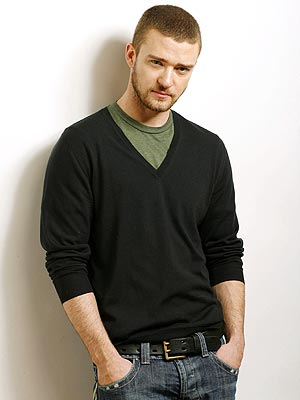
" src="http://upload.wikimedia.org/wikipedia/commons/thumb/9/97/Justin_Timberlake.jpg/220px-Justin_Timberlake.jpg" border="0"> Celebrity haircuts Justin Timberlake hair " src="http://z.about.com/d/mensfashion/1/5/r/P/JT.jpg" border="0">Justin Timberlake was just a small blip on the radar until he shaved his head and then -- BAM! His former curly, highlighted hairstyle was replaced with a tight buzzcut and he became a sex symbol overnight. Sometimes cutting it off is the best option. Justin's not afraid to change it up, from a tight buzz with a shaved part to a highly textured faux hawk. He always manages to look great.
There is no one hairstyle or color that will work for every woman, but there is a look that is just right for you. So the overall goal is to be not just more beautiful but more confident and comfortable with who you are.
Prom haircuts
Prom hairstyles, such as the Pinned Up Ringlets, are perhaps not the easiest look to get right but if done correctly are sure to create a lasting impression. The look makes use of masses of loose curly hair, that is pinned up with ringlets, that cascade from the top of the head and up from the neck line
Prom hairstyles for women stylish hairstyle- prom hairstyle for you long prom hairstyle fashion prom hair style prom haircuts pictures celebrity prom hairstyle
As a form of control, the Sound ninja Orochimaru will place cursed seals on those he wishes to grant more power. Orochimaru developed the enzyme to create the cursed seal from a young man named Juugo who sought help from him. Juugo's body naturally entered into this "Level 1" and "Level 2" state, which caused him to lose control and enter a state of powerful blood lust. Orochimaru experimented with this ability and developed a way to grant this power to other normal ninja. Once the seal is placed on a ninja the chance of surviving is one in ten. Once in place the seal will grant the wearer the ability to access their real power. By releasing chakra, the seal becomes active and begins to forcibly pull out even more chakra. When the wearer releases the cursed seal to activate the extra chakra, they will lose their free will permanently over time, transforming the user into Orochimaru's slave.
When a user first receives the cursed seal on their body, they are only able to access the "Level 1" power. With time the infection can spread and gain a "Level 2" power. The Level 2 form will dramatically increase the wearer's power. When initiated, the Level 2 power will also manifest physical changes in the wearer. The seal will end up covering their entire body, the skin color will change and protrusions will begin to sprout from different parts of the body. The changes inherent in the different forms resemble the changes undergone by Juugo as well.
The spread of the Level 2 power can come in two fashions: 1) The natural spread of the infection over time. 2) The drinking of the Seishingan drug, which places the individual into a near death state. By ingesting the drug, the enzyme infection will forceful spread and cause the body to die. However, the use of the Four Sounds barrier jutsu will reduce the side effect of the curse and allow the body time to adjust to the level of infection without the individual expiring. Once the body is able to handle the infection, the users Level 2 power will then be fully activated.
Numerous prisoners were experimented on with curse seals at Orochimaru's northern base. After hearing of Orochimaru's death, the prisoners rebelled and tried to flee the compound.
Online Tattoo School Training & Certification You are not paying for his name and getting placed with an unknown artist Gary Gray jr. will personally guide you through the tattoo learning processes! Limited Seating! SCHOOL ID INFORMATION will be sent after payment along with a copy your school guides, Videos will follow in the mail by registered mail. Want to Learn How To Tattoo? A Message from
Su difícil para cualquier mujer pasar de largo a corto el pelo porque piensan que van a poder recuperar su pelo en el tiempo cuando sea necesario. Sin embargo, muchas mujeres se van para los corto debido a la pesada carga de locura para ellos con el uso de estos famosos cortes de pelo corto dondequiera que vayan en funciones.
Cuando se trata de bob peinados, hay tantos diferentes tipos en que uno de los cuales es corto bob peinados seguido por capas, clásico, invertida, en ángulo, apilados hairstyles.Generally bob, bob cabello comienza a partir de oreja a nivel hasta los hombros. Cortes de pelo corto bob a las personas con el pelo muy rizado puede hacer una persona la cabeza de ver como un triangle.The siguientes imágenes a continuación son los diferentes tipos de peinados bob desde principiantes hasta experimentados. Bob cortes de pelo a la gente con el pelo rizado tienden a ver mejor si son de corte ya la variedad.
Algunas personas disfrutan de un gasto enorme cantidad de tiempo cada mañana en su pelo - haciendo que cada individuo y cada capítulo ver perfecto antes de salir de casa. Sin embargo, cuando le vayan a hacer una cabeza de baño todo su trabajo va de residuos y tiene el estilo de su cabello again.Short bob cortes de pelo son también muy bien, porque el corte puede lucir bien durante varios months.Styling sólo requiere un pincel redondo, secador. El rizado extremos se pueden crear con el pincel redondo.
Temporary Tattoos Sexy Lower Back Variety Pack, 36 Tattoos (Pack of 2)Temporary Tattoos are premium quality and made in the USA. These Tattoos apply to faster and easier than any other brand (just 10 seconds). They look totally realistic on the skin?just like a real tattoo! 100% waterproof , even while swimming and bathingSee Price: Temporary Tattoos Sexy Lower Back• New Jumbo variety Pack
Hello sobat blogger semua..!!! Nice to meet you again. Ngomong-ngomong tw nggak sobat blogger yang dimaksud dengan Drop Down Accordion Menu?? Ok byar tak kasih penjelasan sedikit dulu, Drop down accordion menu adalah Drop Down menu yang seperti Cacing accordion atau dalam bahasa indonesianya bisa disebut juga daftar menu yang otomatis menurun kebawah ketika mouse mendekatinya, atau bisa dibilang juga menu yang otomatis turun kebawah seperti cacing akordion ketika di lewati tikus (mouse). Pada saat tikus (mouse) lewat kesana Si cacing na lari ketakutan karena nanti mo dimakan tikus tipe baru yang suka makan cacing akordion. Hahaha haha........!!! Sorry friend..that's all just bullshit alias non sense my friend. Well cukup becandanya langsung kita praktekkan saja ^_^.
Perhatikan baik-baik langkah berikut ini klo memang pengen buat Drop Down Accordion Menu yang keren ini..hehehehe
1. Tentunya kamu harus dah Login dulu di Blogger 2. Pada Halaman Dasboard pilih Layout 3. Di Tab layout pilih Edit HTML 4. Centang / Checklist tanda Expand Widgets 5. Cari Kode </head> byar gampang tekan tombol CTRL + F 6. klo sudah ketemu copy - paste kode di bawah ini kemudian taruh sebelum</head>
headerclass: "headerbar", //Shared CSS class name of headers group
contentclass: "submenu", //Shared CSS class name of contents group
revealtype: "mouseover", //Reveal content when user clicks or onmouseover the header? Valid value: "click", "clickgo", or "mouseover"
mouseoverdelay: 200, //if revealtype="mouseover", set delay in milliseconds before header expands onMouseover
collapseprev: true, //Collapse previous content (so only one open at any time)? true/false
defaultexpanded: [0], //index of content(s) open by default [index1, index2, etc] [] denotes no content
onemustopen: true, //Specify whether at least one header should be open always (so never all headers closed)
animatedefault: false, //Should contents open by default be animated into view?
persiststate: true, //persist state of opened contents within browser session?
toggleclass: ["", "selected"], //Two CSS classes to be applied to the header when it's collapsed and expanded, respectively ["class1", "class2"]
togglehtml: ["", "", ""], //Additional HTML added to the header when it's collapsed and expanded, respectively ["position", "html1", "html2"] (see docs)
animatespeed: "normal", //speed of animation: integer in milliseconds (ie: 200), or keywords "fast", "normal", or "slow"
oninit:function(headers, expandedindices){ //custom code to run when headers have initalized
//do nothing
},
onopenclose:function(header, index, state, isuseractivated){ //custom code to run whenever a header is opened or closed
//do nothing
}
}) </script><style type="text/css">
.submenu{display: none}
</style> <style type="text/css"> .hitsukefx3{
width: 100%; /*width of menu*/ } .hitsukefx3 .headerbar{
font: bold 14px arial;
color: white;
border: 2px solid #d9e3ff;
-moz-border-radius-topleft:5px;
-moz-border-radius-topright:5px;
-moz-border-radius-bottomleft:5px;
-moz-border-radius-bottomright:5px;
margin-bottom: 0; /*bottom spacing between header and rest of content*/
text-transform: uppercase;
padding: 7px 0 7px 20px; /*20px is left indentation of header text*/
} .hitsukefx3 .headerbar a{
text-decoration: none;
color: white;
display: block;
} .hitsukefx3 ul{
list-style-type: none;
margin: 0;
padding: 0;
margin-bottom: 0; /*bottom spacing between each UL and rest of content*/ } .hitsukefx3 ul li{
padding-bottom: 2px; /*bottom spacing between menu items*/
} .hitsukefx3 ul li a{
font: normal 12px Arial;
color: white;
background: #fff;
display: block;
padding: 5px 0;
line-height: 17px;
padding-left: 20px; /*link text is indented 20px*/
text-decoration: none;
} .hitsukefx3 ul li a:visited{
color: white;
} .hitsukefx3 ul li a:hover{ /*hover state CSS*/
color: white;
background: #fff;
} </style>
<div class="hitsukefx3"> <h3 headerindex="0h" class="headerbar"><a href="#">Header Link Default</a></h3>
<li><a href="http://hitsuke.blogspot.com/2009/08/membuat-drop-down-accordion-menu.html" title="Klik disini untuk mendapatkan menu yg seperti ini..!!">Get DDA Menu Here</a></li> </ul> </div>
</div>
<!-- End DD Accordion Menu - http://www.hitsuke.blogspot.com -->
10. Setelah di Paste di Gadget tadi di SAVE ya..^_^
Maaf ya sobat blogger di tutorial kali ini masalah mengkostumisasi style css nya di cari tau sendiri aja ya. Mungkin Style Css na diatas cuma cocok buat template na hitsuke. Jadi bagi yang mo ganti di sesuaiin aja ndiri ma template blogger na masing - masing. Hm...klo masalah link na boleh dirubah sesuai keinginan sendiri tapi jangan merubah link yang paling bawah ya sob, PLEASE BGT JANGAN DIRUBAH YA...!!!!. Ya udah sekian dulu buat cara membuat drop down menu accordion. Semoga Bermanfaat and GOOD LUCK sukses selalu ^_^.
Membuat Show - Hide Floating Menu Wah gak q sangka sebelumnya, ternyata show - hide floating guest book ini keren juga. Awalnya sih q gak mau mempostingin yang ginian, tapi karena sobat blogger kita banyak yang bilang keren and ada juga yang request pengen yang seperti ini juga, ya udah akhirnya q mulai nulis postingan ini deh. Ok dhe ladies and gentlements kita mulai langsung aja tutorialnya, simak dan perhatikan baik-baik ya ^_^
1. Seperti biasa langkah yang pertama adalah Login dulu k blogger 2. Pilih Layout kemudian pada page element pilih Add Gadget (Sebenarnya gak mesti tambah gadget baru sih. Bisa juga di selipin di Gadget yg sudah terpasang.) 3. Pilih yang HTML / Javascript 4. Copy - Paste kode berikut ini kemudian masukin kedalam gadget (HTML / JavaScript) tadi
5. Temukan kode berikut (byar gampang nyarinya: tekan CTRL + F)
<!-- Taruh Kode Shoutmix Kamu disini -->
kemudian ganti dengan kode shoutmix / menu apa ajalah yang berbentuk HTML.
6. Jangan lupa Di SAVE
Keterangan Coba perhatikan code diatas di bagian * html #hitsukeFX{position:relative;} kan ada code height untuk tinggi gambar dan width untuk lebar gambar, nah kode itu harus disesuaikan dengan ukuran gambar backround nya kalau misalnya kamu mo ganti OK..^_^ selajutnya coba liat di bagain .hitsukeFXcontent{ kan ada kode seperti ini border:2px solid #d9e3ff; nah kode yang ini buat border / garis pinggirnya ganti kode warna #d9e3ff sesuai keinginanmu. background:#ffffff; klo kode ini buat warna latar belakang / backgroundnya ganti kode warna #ffffff sesuai keinginanmu. kemudian Keterangan
Coba perhatikan code diatas di bagian * html #hitsukeFX{position:relative;} kan ada code height untuk tinggi gambar dan width untuk lebar gambar, nah kode itu harus disesuaikan dengan ukuran gambar backround nya kalau misalnya kamu mo ganti OK..^_^ selajutnya coba liat di bagain .hitsukeFXcontent{ kan ada kode seperti ini border:2px solid #d9e3ff; nah kode yang ini buat border / garis pinggirnya ganti kode warna #d9e3ff sesuai keinginanmu.
background:#ffffff; klo kode ini buat warna latar belakang / backgroundnya ganti kode warna #ffffff sesuai keinginanmu. kemudian coba perhatikan baik-baik kode <br/>G<br/>u<br/>e<br/>s<br/>t <br/><br/><br/>B<br/>o<br/>o<br/>k jika di hilangin kode html na akan terbaca GUEST BOOK. klo mo ganti tulisannya sertakan kode <br/> agar tulisannya terlihat vertikal kemudian sertakan <br/><br/> untuk spasinya. Oy jangan sampei lupa ganti tulisan <!-- Taruh Kode Shoutmix Kamu disini --> dengan kode shoutmix kamu
Nah kode diatas untuk buku tamu yang bisa diganti-ganti tulisannya. Klo kamu mau yang langsung berbentuk gambar juga ada kox. Nieh dia code nya Pink TAB
Black TAB
Bagi pengguna wordpress ato yang lainnya sepertinya bisa deh tinggal Copy - Paste aja, gw kurang yakin karena gw gak pernah make yang lain selain blogger. tapi coba aja deh...!! Sekian dulu ya smoga bermanfaat. Good Luck..!!! ________________________________________________________________
Note 1 : MOHON JANGAN DI GANTI LINK Q YANG ADA SANA YA SOBAT..!!!
Note 2 : Sebenarnya nggak mesti shoutmix ato guest book yang diletakkan disana, smua kode yang berbentuk html bisa kox di letakkan disana. Misalnya kamu mau melatakkan Navigation Menu, Floating Taskbar, Blog list, flash navigation menu, ato bahkan blog kamu juga bisa di buat melayang disana. Pokoknya terserah kamu deh yang penting tetap semangat, kreative, and terus berkarya OK..!!! ^_^
Romantic Wedding Hair Styles Romantic hairstyles loose chignons, half updos, loose tangles of curls and braids, and French twists. If this is the look you want, visit a stylist a few months in advance and let him or her experiment, trying out several styles to pick the one that suits you the best. Sophisticated hairstyles for wedding Sophisticated wedding hairstyles can be as simple as a great haircut with dramatic highlights. Short cuts are a great way to get sophisticated wedding hair, but women with medium-length or long hair can also get this look by paying attention to the lines of their cut. Brides that wish to look sophisticated on their wedding day should find a salon in an urban area or a salon elsewhere that advertises they have “city style” and try out a stylist there well in advance of the waiting date. Casual Wedding Hair Styles Ideas Casual wedding hair styles are the easiest wedding look for hair. They are favored by brides who want to get married outside, or whose most important goal for their wedding day is to have fun. Casual wedding hair doesn’t need to be planned far in advance; the bride can accomplish it herself by sticking with an everyday style that she knows flatters her. Make the look special by adding flowers to the hair or some other form of embellishment.
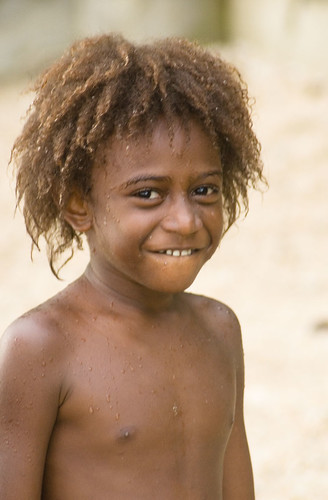
Long haired boy on the beach at Melanesia Vanuatu is at the crossroads between Polynesian and Melanesian migration, and its population often demonstrate stunning combinations of their respective attributes. Long hair is any hairstyle which is relatively long. Exactly what constitutes "long hair" can change from culture to culture, or even within cultures. For example, a woman with chin-length hair in many cultures may be said to have short hair, while a man with the same length of hair in some of the same cultures would be said to have long hair. Scientists view long hair as playing a large part in any animal species' natural selection, since hair length is frequently a sign of health. Freudian psychoanalysts also see it in a sexual light, as a representation of the id's release from the suppression of the superego.
An afro, sometimes called a "natural" or shortened to "fro", is a hairstyle in which the hair extends out from the head like a halo, cloud or ball. This may or may not include wearing such afros long, to several times the diameter of the head.
Afro hair Style A woman with an afro at the Tribeca Film Festival
An afro requires very curly hair. For many people of African descent, an afro is the way the hair grows naturally. Anyone of any ethnic background is capable of growing an afro if they have very curly hair. For people of African descent, the spiraling, tightly coiled curls can be straightened out somewhat, giving the hair added volume and length, by first braiding the hair, then separating the coils using an "afro pick". The afro pick is an adaptation of a traditional African grooming instrument,which is essentially a narrow comb with long, widely spaced teeth. Similarly, added volume can be achieved using an afro pick in combination with the heat from a hand-held hair dryer. The effect is called a blowout afro.
Here are some afro hairstyle pictures:
Branford Marsalis with a classic afro. A Jewish-American youth sports a Jewfro at his high school. Afros were originally used as a cultural statement to counter western influences on natural African hairstyles and ways of life Ms. Hill performing in Prague, Summer 2007
Her improbably high beehive hairdo reminds me of Marjorie Simpson. Anyway, she is looking very untidy with this hairstyle. Do you know that beehive works best on hair that hasn’t been washed for few days and are at least of shoulder length. Anyhow, let her think I’m No Good, and we’ll neatly make a beehive hairstyle. In early 60s this hairdo was on its peak of popularity and is also known as B-52. Amy has returned to public limelight, almost, with her newfound beehive hairstyle.
There's no hair style like the bee hive. Thank goodness. But here's Jennifer Young, actually looking quite pretty Hannah's face suits the beehive hairstyle very well. Peter also did her make-up which is in authentic early 1960's style. In the background can be seen the crimsons seats, bodywork, windows and seat belts of Peter's Triumph Herald which dates from 1965 Wedding beehive hairstyle
Membuat Read More Otomatis (Automatic Read More + Thumbnail Image)
Read more otomatis (Automatic Read more ) adalah read more atau baca selengkapnya dengan secara otomatis mengambil ringkasan dari blog kita di tambah lagi read more otomatis ini juga akan mengambil gambar thumbnailnya. Klo pake read more / baca selengkapnya yang biasa kan agak repot tuh di saat setiap kali mau New Post / menambah postingan baru kita harus menambahkan kode <span class="fullpost> isi postingan </span> atau <span id="fullpost">isi postingan</span>,, Capeeek Dhe....!!! jaman sekarang mah da basi nieh yang ginian...hehehehe... nah bagi yang gak mau lagi disusahkan oleh read more yang seperti ini sekarang ikutin aja nieh tips dan trik membuat Read more otomatis berikut ini
Ini dia Contoh Read MOre otomatis nya - biar lebih jelas klik disini
klik untuk memperbesar gambar
Ikuti langkah-langkah berikut ini untuk membuatnya
1. Login di Blogger > pada Dasboard pilih Rancangan > Edit HTML 2. Centang / Check List dulu "expand widget templates" 3. Cari kode</head> kemudian copy - paste kode di bawah ini sebelum kode tersebut
kamu juga bisa mengubah kode tersebut sesuai selera
summary_noimg = 430; kode ini untuk memotong / mengatur tinggi tanpa gambar
summary_img = 340; kode ini untuk memotong / mengatur tinggi dengan gambar
img_thumb_height = 100; kode ini untuk tinggi gambar thumbnailnya
img_thumb_width = 120; kode ini untuk lebar gambar thumbnailnya
4. Sekarang cari kode
<data:post.body/> , hati-hati ya bagi yang sudah memakai read more yg tidak otomatis, biasanya ada dua kode yang seperti itu, jadi pilih yang pertama. Klo Udah ketemu copy - paste kode berikut lalu ganti dengan kode dibawah ini
tulisan read more disana bisa kamu ganti sesuai keinginan. gmn..? sudah blom.?? Hm..klo sudah di SAVE ya..!!!
Sekarang coba liat Blog kamu pasti jadi lebih menarik dan tidak repot lagi klo mo posting. ^_ ^
Trus Bagai mana dengan yang udah pakai read more yang lama?? gman cara ganti dengan read more otomatis ini?? Nah kode yang read more yang lama kan seperti ini (setiap template boleh jadi berbeda lho, jadi hati-hati ya)
<div class='post-header-line-1'/>
<div class='post-body entry-conten'>
<b:if cond='data:blog.pageType == "item"'>
<style>.fullpost{display:inline;}</style>
<p><data:post.body/></p>
<b:else/>
<style>.fullpost{display:none;}</style>
<p><data:post.body/></p>
<a expr:href='data:post.url'>Read More......</a>
</b:if>
lalu hapus kode yang di tebalkan kemudian ikuti langkah 1 sampai 4. Sekian dulu yah sob smoga bermanfaat, jangan lupa kritik dan sarannya dengan mengisi kotak komentar q Xeps..!!?? GOOD LUCK..!!!
Tag : Membuat read more otomatis, otomatis read more, otomatis baca selengkapnya untuk blogger, membuat read more otomatis untuk blogger, How to create automatic read more for blogger, create read more automatic with thumbnail image / picture, automatic read more catch pictrue / image
 " src="http://z.about.com/d/mensfashion/1/5/r/P/JT.jpg" border="0"> Justin Timberlake was just a small blip on the radar until he shaved his head and then -- BAM! His former curly, highlighted hairstyle was replaced with a tight buzzcut and he became a sex symbol overnight. Sometimes cutting it off is the best option. Justin's not afraid to change it up, from a tight buzz with a shaved part to a highly textured faux hawk. He always manages to look great.
  " src="https://blogger.googleusercontent.com/img/b/R29vZ2xl/AVvXsEiG2SCcRm_C9bqd6YYbKxC1w7FLgDtzCM15ZushPo4aSJ9UMpx8vBs6FyGkNXy1QySdsGtELMEH3mrM2MJiKw8xANaDnImCXW0NOCOdyt2BuEb-cGoahGUAC-NIRpn1NcKn4LGCGa12S0A/s400/justin2.jpg" border="0"> Justin usually wears a short hairstyle during his performance, such as crew cut, buzz cut, etc. His buzz cut (as shown above) bring his natural curls easy to maintain. With this short style, he looks sexy, clean, & smart.
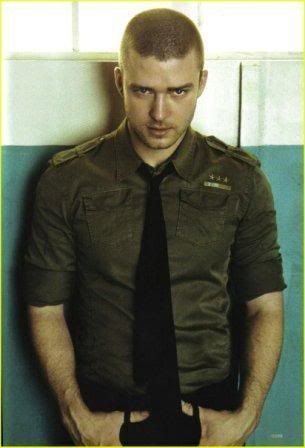 " src="http://i165.photobucket.com/albums/u76/jennifer9982/justin-timberlake-gq-magazine02.jpg" border="0"> If you are a fan of Justin Timberlake, you may interested with Celebrity hairstyles Justin Timberlake
 " src="https://blogger.googleusercontent.com/img/b/R29vZ2xl/AVvXsEgFIrzjDqin3Fdtsd1BD5etN15K4chJ-ODJL4m5jG8mQ3oKNJRmAMoHycwX5w3mXnBDmhWqsXteqL-xf0wi_RhVb_gxs-Vgojx5sLco1_6v9C9EdoXcinKe7yNJ6VF_AzsMnM_QMbzbKfk/s400/justin.jpg" border="0"> Celebrity hairstyles Justin Timberlake hairstyle
 " src="http://z.about.com/d/menshair/1/0/Y/0/-/-/timberlake.jpg" border="0">